GET IN TOUCH
- Please wait...

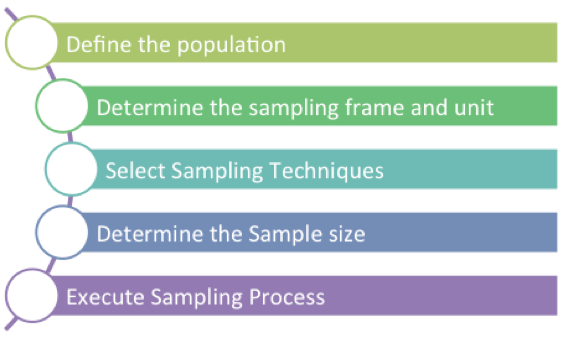
In the first part of this article, I have touched on some of the basic terminologies of sampling and the first of the five steps of the sampling process. The second part starts from where I left off and hopes to explain the 4 remaining steps of developing a good sampling plan with some relevant examples.
Once you have selected your study population, the university students from the Dhaka district in this particular example, you should try to prepare a structured sampling frame for your convenience of sampling. Ideally, it should be a comprehensive student list across all the universities in the Dhaka area that should contain basic student information like their names, area of concentration, study year, and contact information.
Along with the sampling frame, you also need to decide on the sampling unit you will be studying, which are the smallest units from which the samples will be selected. In this example, sampling units can be either universities or institutions or departments, or just university students. This unit may vary depending on your needs but you will have to identify the sampling unit you want to analyze for the next step.
After you have got the sampling frame, you need to figure out how you are going to select the students (sampling unit) you want to study from the list. You can use a number of techniques to select samples like
These techniques are all different variations of probability sampling, where each student of the sampling frame (student list) has a known non-zero probability of being selected, and this probability can be accurately determined.
But if you don’t have a sampling frame (student list), you may choose one of the non-probability sampling techniques like
In the non-probability sampling technique, students are usually selected from the universities in some nonrandom manner and the probability of selection can’t be accurately determined.

Figure: Sampling Techniques
The size of the sample depends on a variety of factors like the type of research, the elements being studied, population size, accessibility, confidence level, resource availability, desired accuracy level, and so on. Although there are no hard and fast rules when it comes to selecting the sample size, many statisticians claim that a number between 30 and 500 is optimum for any study. Some statisticians also say that the sample size should be at least 30% of the whole population in order to get a close approximation of the population traits.
Sometimes, you may also consider sampling the entire population, which is also called a census, when your population size is very small or in some rare cases when you have extensive resources available at your disposal.
This step should be easy if the previous steps are done well. All you need to do is follow the sampling plan and collect data from the selected sampling units accordingly. We usually conduct a pilot or field test to verify the strength of the plan and its compatibility with the end results before hitting the actual study area. Once the field test is done, we make the necessary changes prior to collecting the primary data from the targeted respondents for analysis.

Figure: 5 steps of the sampling process
Apart from this, there are many other concepts that could not be explained in this article. To know more on this topic, you may take a look at my presentation on the Sampling plan where I have explained some of the key theories in detail:
http://www.slideshare.net/LightcastlePartners/sampling-planresearch-methodologylightcastle-partners
Our experts can help you solve your unique challenges
Stay up-to-date with our Thought Leadership and Insights